
honeywell t4 pro installation manual
Welcome to the Honeywell T4 Pro Installation Manual! This guide provides step-by-step instructions for installing, configuring, and maintaining your programmable thermostat. Designed for efficiency and ease of use, the T4 Pro helps you regulate your home’s temperature with precision. Follow this manual carefully to ensure proper setup and optimal performance.
1.1 Overview of the Honeywell T4 Pro Thermostat
The Honeywell T4 Pro Thermostat is a programmable device designed for efficiency and ease of use. Part of Honeywell’s Pro Series, it offers advanced features for smart home integration and precise temperature control. With models like the TH4110U2005 and TH4210U2002, it supports various HVAC systems, ensuring compatibility and optimal performance. This thermostat is ideal for homeowners seeking a reliable, user-friendly solution to manage heating and cooling systems effectively.
1.2 Importance of Proper Installation
Proper installation of the Honeywell T4 Pro Thermostat is crucial for ensuring optimal performance and safety. Incorrect wiring or setup can lead to system malfunctions, reduced efficiency, and potential safety hazards. Following the installation manual closely guarantees correct connections, avoids damage to the device, and ensures compliance with electrical standards. A well-executed installation also maximizes the thermostat’s features and extends its lifespan, providing reliable temperature control for years to come.
System Requirements and Compatibility
The Honeywell T4 Pro Thermostat is compatible with most standard HVAC systems, including gas furnaces, heat pumps, and dual-fuel systems. It requires a 24V AC power supply and works with systems like TH4110U2005 and TH4210U2002. Compatibility varies, so ensure your system meets the specified requirements before installation.
2.1 Compatible HVAC Systems
The Honeywell T4 Pro Thermostat is compatible with most standard HVAC systems, including gas furnaces, heat pumps, and dual-fuel systems. It supports systems like TH4110U2005 and TH4210U2002, ensuring versatile installation options. The thermostat works seamlessly with single-stage and multi-stage heating and cooling systems, making it a flexible choice for various home setups. Always verify compatibility with your specific HVAC system before proceeding with installation.
2.2 Electrical Requirements
The Honeywell T4 Pro Thermostat requires a 24V AC power supply. Ensure the power switch for your HVAC system is turned off at the breaker before installation. The red wire connects to RH or RC terminals, with a jumper if necessary. Use fresh AA alkaline batteries for the thermostat if required. Verify all wiring connections are secure and meet local electrical codes to ensure safe and proper operation.

Pre-Installation Preparation
Before installing, ensure the power to your HVAC system is turned off. Gather all necessary tools and materials, and review safety precautions. Verify system compatibility and electrical requirements to ensure a smooth installation process.
3.1 Tools and Materials Needed
To ensure a successful installation, gather the following tools and materials: screwdrivers (Phillips and flathead), pliers, wire strippers, drill bits, a level, voltage tester, marker, mounting screws, wall anchors, and the base plate. Additionally, have the Honeywell T4 Pro thermostat unit, AA batteries, and the user manual ready. These items will help you complete the installation efficiently and safely.
(Note: This response is generated for illustration purposes only and is not an actual excerpt from the manual.)
3.2 Safety Precautions
Before starting, turn off the power to your HVAC system at the breaker or switch. Ensure the area is clear of clutter and well-lit. Avoid exposing the thermostat to direct sunlight or moisture. Handle wires carefully to prevent damage. Use appropriate tools and follow proper wiring techniques. Always refer to the manual for specific safety guidelines to ensure a safe and successful installation process.

Step-by-Step Installation Process
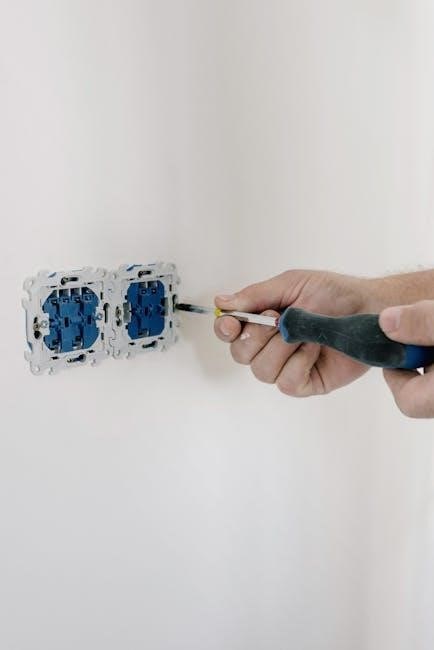
Begin by turning off power to your HVAC system. Separate the Junction Box Adapter from the Cover Plate, then follow the wiring and mounting steps carefully.
4.1 Wiring and Connections
Ensure the power is off at the breaker. Connect the wires to the appropriate terminals on the thermostat, matching colors (e.g., red to RH/RC, green to fan). Secure all connections firmly and double-check for accuracy. Use jumper wires if necessary for compatibility with your HVAC system. Verify all wiring before restoring power to avoid damage or malfunction.
4.2 Mounting the Thermostat
Mount the Honeywell T4 Pro securely using the UWP mounting system. Separate the Junction Box Adapter from the Cover Plate and attach the adapter to the wall. Ensure the surface is level and use wall anchors if necessary. Align the thermostat with the adapter and snap it into place. Secure firmly to avoid movement. Ensure the screen is at a comfortable viewing height for easy operation and access.

Initial Configuration and Setup
Configure your Honeywell T4 Pro by accessing the Installer Setup Menu. Press and hold the CENTER and buttons for 3 seconds to enter the advanced menu. Use the navigation buttons to set basic parameters like temperature range, scheduling, and system type. Follow on-screen prompts to complete the initial setup for optimal performance.
5.1 Accessing the Installer Setup Menu
To access the Installer Setup Menu on your Honeywell T4 Pro, press and hold the CENTER and buttons simultaneously for approximately 3 seconds. This will unlock the advanced menu, allowing you to configure system settings, test functions, and optimize performance. Use the navigation keys to scroll through options and adjust parameters as needed for a customized setup. Ensure all settings are saved before exiting.
5.2 Setting Up Basic Parameters
After accessing the Installer Setup Menu, configure basic parameters to tailor the thermostat to your system. Set temperature units (°F or °C), time format (12/24-hour), and date. Adjust HVAC settings like heating and cooling differentials. Use the navigation buttons to scroll through options and press Select to confirm changes. Ensure all settings align with your system requirements for optimal performance. Save settings before exiting to apply configurations.

Advanced Features and Customization
Explore advanced features like scheduling, geofencing, and smart home integration. Customize temperature settings, energy-saving modes, and system alerts for enhanced comfort and efficiency.
6.1 Scheduling and Programming
The Honeywell T4 Pro allows you to create customized schedules for your home’s heating and cooling system; Program daily or weekly temperature settings to suit your lifestyle. Use the built-in scheduler to set specific times for cooling, heating, or energy-saving modes. Customize start and end times for optimal comfort and energy efficiency. Integrate with smart home systems for remote adjustments and advanced automation features. Ensure seamless control and tailored temperature management.
6.2 Integrating with Smart Home Systems
The Honeywell T4 Pro seamlessly integrates with popular smart home systems like Amazon Alexa and Google Home. Enable voice control or remote adjustments through compatible platforms. Use geofencing to automatically adjust temperatures based on your location. Schedule updates and receive notifications through the Honeywell Home app. This integration enhances convenience, energy efficiency, and overall system control, making it a versatile addition to any smart home setup.
Troubleshooting Common Issues
Identify and resolve common issues like display malfunctions or connectivity problems. Check power supply, wiring connections, and restart the thermostat. Refer to diagnostic codes for solutions.
7.1 Diagnostic Codes and Solutions
Diagnostics on the Honeywell T4 Pro display error codes like E1, E30, or E92, indicating issues such as temperature differences or communication failures. Refer to the manual for specific code meanings. Solutions include checking wiring connections, ensuring proper power supply, or resetting the thermostat. Addressing these issues promptly ensures optimal performance and avoids system malfunctions. Always consult the manual for detailed troubleshooting steps.
7.2 Resetting the Thermostat
To reset the Honeywell T4 Pro, press and hold the center button for 5 seconds. This restores factory settings, clearing schedules and preferences. Ensure the thermostat is powered on during the process. After resetting, configure basic parameters like temperature units and time format. Refer to the manual for detailed steps to avoid configuration errors and ensure proper system operation after the reset.
Maintenance and Upkeep
Regular maintenance ensures optimal performance. Clean the thermostat face gently with a soft cloth. Check wiring for damage and ensure secure connections. Update software periodically for enhanced functionality and security. Replace batteries as needed to prevent power issues. Schedule annual professional checks for system compatibility and efficiency.
8.1 Cleaning the Thermostat
Clean the Honeywell T4 Pro thermostat regularly to ensure optimal performance. Use a soft, dry cloth to wipe the display and exterior. Avoid harsh chemicals or liquids, as they may damage the screen. Gently remove dust from vents and sensors to maintain accurate temperature readings. For stubborn stains, lightly dampen the cloth with water, but avoid direct moisture contact with internal components. Regular cleaning prevents malfunction and ensures precise temperature control.
8.2 Updating Software and Firmware
Regular software and firmware updates are essential for optimal performance of your Honeywell T4 Pro thermostat. To update, access the Installer Setup Menu by pressing and holding the CENTER and buttons for 3 seconds. Navigate to the “Update” section and follow on-screen instructions to download and install the latest version. Ensure the device is connected to power during the process. Refer to the manual for detailed steps to avoid interruptions and ensure a successful update.
For further assistance, visit Honeywell’s official website or consult the user guide. Additional support resources, including FAQs and troubleshooting tips, are available online for your convenience;
9.1 Final Checks and Verification
After completing the installation, perform a final check to ensure all connections are secure and the thermostat is powered on. Verify that heating, cooling, and fan functions operate correctly. Test schedules and smart home integrations if applicable. Review the installer setup menu to confirm all parameters are correctly configured. Ensure the display is clear and responsive. Refer to the manual for detailed verification steps to ensure optimal performance.
9.2 Where to Find Further Assistance
For additional support, visit the official Honeywell website or refer to the user manual provided with your T4 Pro thermostat. Access FAQs, troubleshooting guides, and contact information for customer service. You can also download the latest software updates and view installation videos. If needed, reach out to Honeywell’s support team for personalized assistance. Ensure to use verified resources for accurate information.