leadfan car stereo manual
Welcome to the Leadfan Car Stereo Manual! This guide provides detailed instructions for installing‚ operating‚ and troubleshooting your car stereo system‚ ensuring optimal performance and functionality.
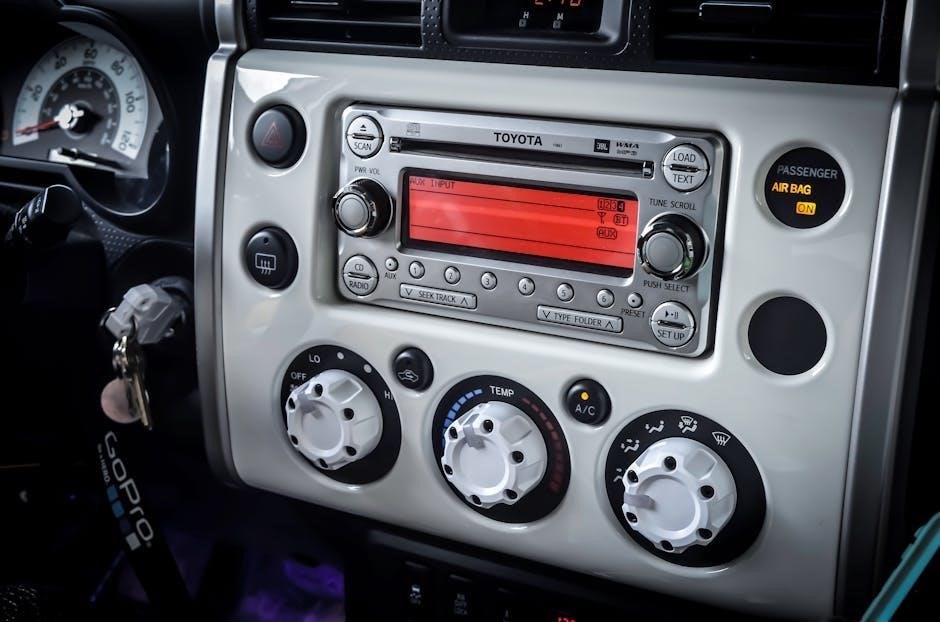
1.1 Overview of the Leadfan Car Stereo System
The Leadfan Car Stereo System is a 7-inch HD touchscreen multimedia player designed for modern vehicles. It supports Bluetooth‚ Apple CarPlay‚ and Android Auto‚ offering seamless smartphone integration. With voice control and backup camera compatibility‚ it enhances driving convenience. The system operates on a 12V DC power supply and features USB‚ AUX‚ and subwoofer support for an immersive audio experience.
1.2 Importance of Reading the Manual
Reading the manual is crucial for proper installation‚ functionality‚ and troubleshooting. It provides essential guidance for understanding features‚ resolving issues‚ and optimizing performance. Proper setup ensures safety and compatibility‚ while incorrect installation can lead to malfunctions. Familiarizing yourself with the manual guarantees a seamless experience and maximizes your car stereo’s potential.

Before Installation
Before installing your Leadfan Car Stereo‚ ensure compatibility with your vehicle and power supply. Prepare necessary tools and review pre-installation checks for a smooth setup process.
2.1 Pre-Installation Checks
Before installing your Leadfan Car Stereo‚ ensure your vehicle is compatible and prepare necessary tools. Verify the power supply is 12V DC and check the rear interface connections. Confirm all wires‚ including the red and yellow power wires‚ are correctly identified. Ensure the stereo’s dimensions match your vehicle’s dashboard for proper mounting and functionality.
2.2 Understanding the Rear Interface
The rear interface of the Leadfan Car Stereo includes essential connectors for power‚ audio‚ and additional features. Identify the power connectors (red and yellow wires)‚ audio input/output ports‚ and USB/AUX interfaces. Ensure proper connections for Bluetooth‚ backup cameras‚ and subwoofer support. Familiarize yourself with the wiring harness to ensure compatibility and seamless functionality during installation.
2.3 Power Supply Requirements (12V DC)
Your Leadfan Car Stereo requires a stable 12V DC power supply. Connect the red (constant power) and yellow (accessory power) wires to your vehicle’s electrical system. Ensure proper wiring to avoid damage. Incorrect voltage or wiring can lead to system malfunction or damage. Always use the provided wiring harness for a secure and reliable connection.

Installation Guide
Follow these steps to install your Leadfan Car Stereo securely. Ensure proper wiring connections and mount the unit firmly. Test all features post-installation for smooth operation.
3.1 Wiring Instructions

Connect the red and yellow power wires to your car’s 12V DC supply. Ground the black wire to ensure proper electrical flow. Carefully link the speaker wires to your vehicle’s audio system. Use the provided wiring harness adapter for compatibility. Double-check all connections to avoid short circuits. Test the system post-installation to ensure optimal functionality and clear sound output.
3.2 Connecting the Power Cord (Red and Yellow Wires)
Connect the red and yellow wires to your car’s 12V DC power supply. Ensure the red wire links to the battery or ignition‚ and the yellow wire connects to the constant power source. Avoid connecting both wires to the same terminal to prevent short circuits. Securely fasten the connections and test the system afterward. Always follow safety guidelines to avoid electrical hazards. If unsure‚ consult a professional for assistance. Proper wiring ensures reliable performance and longevity of your car stereo system. Double-check all connections before powering on the device to ensure everything functions correctly. This step is crucial for the stereo to operate efficiently and safely. Keep the wiring organized to maintain your car’s interior and prevent potential damage. By following these steps‚ you can enjoy a seamless and safe installation process. Always prioritize safety when handling electrical components. For additional support‚ refer to the detailed wiring diagram provided in the manual. Ensure all connections are secure and insulated to prevent any risk of electrical failure. This will help maintain the stereo’s performance and extend its lifespan. Proper installation is key to enjoying all the features of your Leadfan car stereo. Take your time to ensure each connection is accurate and secure. If you encounter any issues‚ revisit the wiring instructions or seek professional help. Remember‚ a well-installed system enhances both functionality and safety. Always refer to the manual for specific instructions tailored to your car stereo model. This ensures compatibility and optimal performance. Avoid overcomplicating the process by sticking to the provided guidelines. Your patience and attention to detail will result in a successful installation. Once the power cord is correctly connected‚ proceed to the next steps with confidence. A properly connected power supply is essential for the stereo to function as intended. Never overlook this critical step‚ as it forms the foundation of your car stereo’s operation. By carefully following the instructions‚ you can ensure a smooth and efficient setup. This will allow you to fully enjoy the features of your Leadfan car stereo without any issues. Remember‚ proper installation is the first step toward an exceptional user experience. Always prioritize precision and safety when working with electrical systems. This will not only protect your car but also ensure the longevity of your stereo system. A well-executed installation sets the stage for years of trouble-free entertainment and connectivity on the road. Take pride in your work and enjoy the benefits of a seamlessly integrated car stereo system. With the power cord securely connected‚ you’re one step closer to enhancing your driving experience. Always maintain a clean and organized wiring setup to avoid future complications. This will make any future troubleshooting or upgrades much simpler. By adhering to the wiring instructions‚ you can ensure your car stereo operates at its best. A secure and correctly connected power supply is the backbone of a reliable car stereo system. Never compromise on the quality of your connections‚ as this directly impacts performance. Stay safe‚ follow the guidelines‚ and enjoy the fruits of your labor. This step is fundamental‚ so take the time to get it right. Your Leadfan car stereo will thank you with superior performance and reliability. Keep your car’s electrical system in pristine condition by following these wiring instructions. This not only safeguards your investment but also enhances your overall driving experience. Always remember‚ a job well done is a job done safely and correctly. Now‚ move on to the next section with confidence‚ knowing your power supply is securely connected. Proper wiring is just the beginning of your journey with the Leadfan car stereo. Stay tuned for more detailed instructions to unlock its full potential. With each step‚ you’re closer to enjoying a state-of-the-art entertainment system in your vehicle. Keep up the good work and remember to double-check every connection. Your attention to detail will pay off in the long run. For any further assistance‚ refer back to the manual or reach out to support. You’re doing great‚ and your car stereo will soon be fully operational. This is an exciting project‚ and with careful execution‚ it will greatly enhance your driving experience. Stay focused‚ and let’s move forward with the installation process. The correct connection of the power cord is a significant milestone. Celebrate your progress and continue with the same level of dedication. Your efforts will result in a perfectly functioning car stereo system. Keep going‚ and remember to stay safe throughout the process. You’re building something amazing‚ and it’s almost ready to use. The proper connection of the power cord ensures your stereo has the power it needs to perform exceptionally. Well done! Now‚ let’s move on to the next step‚ eager to complete the installation. The journey to a superior car audio experience is almost complete. Stay committed‚ and you’ll be enjoying your new system in no time. With the power cord securely in place‚ the foundation is set for a flawless installation. Keep up the excellent work and proceed with confidence. The end result will be well worth the effort. Your patience and diligence are paying off‚ and the stereo is one step closer to being fully operational. Remember‚ each connection is a step toward a better driving experience. You’re doing fantastic‚ so let’s keep the momentum going. The Leadfan car stereo is ready to shine once all connections are secure. Stay focused‚ and let’s bring this project to life. The correct wiring of the power cord is just the beginning of an exciting new chapter in your car’s audio capabilities. Keep pushing forward‚ and don’t hesitate to seek help if needed. You’re almost there‚ and the finish line is in sight. The proper connection of the power cord is a testament to your dedication to quality. Keep striving for excellence as you complete the installation. The final result will be a car stereo system that exceeds your expectations. Stay committed‚ and let’s make this happen. The journey may be challenging‚ but the reward is well worth it. You’re creating something truly special‚ and it’s almost ready to enjoy. Keep going‚ and remember‚ safety always comes first. The correct connection of the power cord is a crucial step‚ and you’ve nailed it. Now‚ it’s time to move forward with the same precision. Your hard work will pay off‚ and you’ll soon be enjoying your new car stereo. Stay focused‚ and let’s complete this installation together. The proper wiring of the power cord is just the start of an exceptional audio experience. Keep up the fantastic work and proceed with confidence. You’re making great progress‚ and the finish line is within reach. Let’s keep moving forward and bring this project to fruition. The correct connection of the power cord is a significant achievement‚ and you should be proud. Now‚ let’s tackle the next step with the same enthusiasm and attention to detail. Your efforts are truly paying off‚ and the end result will be remarkable. Stay safe‚ stay focused‚ and let’s complete this installation. The power cord is securely connected‚ and now it’s time to move on to the next phase. You’re doing an outstanding job‚ and your dedication is evident. Keep it up‚ and you’ll soon have a fully functional car stereo system. The journey is almost over‚ and the reward is just around the corner. Stay committed‚ and let’s see this through to the end. The proper connection of the power cord sets the stage for a flawless installation. You’re one step closer to enjoying your new car stereo. Keep going‚ and remember to double-check every connection. Your hard work will ensure a superior audio experience. The finish line is near‚ so let’s push through and complete the installation. The correct wiring of the power cord is a testament to your skill and patience. Now‚ let’s move on to the next step with the same level of care. You’re almost there‚ and the end result will be well worth the effort. Stay safe‚ stay focused‚ and let’s bring this project to life. The power cord is securely connected‚ and it’s time to proceed with confidence. You’re doing an excellent job‚ and your attention to detail is commendable. Keep it up‚ and you’ll soon be enjoying your new car stereo. The journey is almost complete‚ and the reward is within reach. Stay committed‚ and let’s finish strong. The proper connection of the power cord is a significant accomplishment. Now‚ let’s move forward with the same dedication and precision. Your efforts are truly paying off‚ and the final result will be exceptional. Stay safe‚ stay focused‚ and let’s complete this installation together. The power cord is securely in place‚ and it’s time to celebrate this milestone. You’re doing a fantastic job‚ and your hard work is evident. Keep going‚ and remember to stay safe throughout the process. The finish line is in sight‚ and the end result will be a state-of-the-art car stereo system. Let’s push through and complete the installation with the same level of excellence. The correct connection of the power cord is just the beginning of an outstanding audio experience. You’re one step
3.3 Mounting the Stereo in Your Vehicle
Mount the Leadfan car stereo securely in your vehicle’s dashboard. Use the provided mounting brackets and screws to ensure stability. Locate the appropriate area‚ remove trim panels carefully‚ and align the stereo for proper fit. Tighten screws firmly but avoid overtightening. Ensure the stereo is at a comfortable viewing angle and test functionality post-installation. Proper mounting enhances both safety and user experience. Always follow the manual’s instructions for specific vehicle compatibility and mounting requirements.

Key Features of the Leadfan Car Stereo
The Leadfan Car Stereo features Bluetooth connectivity‚ Apple CarPlay‚ and Android Auto compatibility‚ enabling seamless smartphone integration. It also includes voice control functionality and backup camera support for enhanced convenience and safety.
4.1 Bluetooth Connectivity
Experience seamless wireless audio streaming and hands-free calling with the Leadfan Car Stereo’s Bluetooth connectivity. Easily pair your smartphone to enjoy music playback‚ manage phone contacts‚ and make or receive calls through the stereo system‚ enhancing your driving experience with convenience and safety.
4.2 Apple CarPlay and Android Auto Compatibility

The Leadfan Car Stereo supports Apple CarPlay and Android Auto‚ enabling seamless integration with your smartphone. Access apps‚ navigation‚ and music directly on the 7-inch HD touchscreen. Voice control functionality enhances convenience‚ allowing you to manage calls‚ messages‚ and playlists hands-free‚ ensuring a safer and more enjoyable driving experience.
4.3 Voice Control Functionality
The Leadfan Car Stereo features voice control‚ allowing you to control functions like calls‚ music‚ and navigation hands-free. To activate‚ press and hold the steering wheel’s function key‚ then select the desired feature on the touchscreen; This enhances safety and convenience‚ enabling seamless operation while driving without distractions.
4.4 Backup Camera Support
The Leadfan Car Stereo supports a backup camera‚ enhancing safety while reversing. When the vehicle is in reverse‚ the stereo automatically displays the camera feed on its 7-inch HD touchscreen. This feature provides clear visibility‚ reducing blind spots and making parking or reversing safer and more convenient for drivers.

Operating the Leadfan Car Stereo
Learn how to navigate the 7-inch HD touchscreen‚ pair your smartphone via Bluetooth‚ and use steering wheel controls for seamless operation of your car stereo system.

5.1 Navigating the 7-Inch HD Touchscreen
Navigate the 7-inch HD touchscreen effortlessly. Access music‚ Bluetooth settings‚ and apps with intuitive taps. Adjust brightness and contrast for optimal visibility. Customize home screen shortcuts for quick access to frequently used features‚ ensuring a smooth and user-friendly experience while driving.
5.2 Pairing Your Smartphone via Bluetooth
To pair your smartphone‚ enable Bluetooth on your device and select the Leadfan Car Stereo from the available options. Once connected‚ you can stream music‚ make hands-free calls‚ and access voice control features. Ensure your phone is compatible with the stereo’s Bluetooth version for a seamless and stable connection experience.
5.3 Using the Steering Wheel Controls
Press and hold the function key on your steering wheel‚ then select the desired function on the car screen. This syncs your steering wheel controls with the stereo‚ enabling easy access to features like volume adjustment and track skipping. Ensure compatibility and proper setup for seamless integration with your vehicle’s controls.